
Creating a WordPress Multisite
Having installed WordPress previously in the wp-config.php just before of the code shown below, we need to add this lines:
define(‘WP_ALLOW_MULTISITE’, true);
/* That’s all, stop editing! Happy blogging. */
|
1
2
3
4
5
6
|
define(‘WP_ALLOW_MULTISITE’, true);
/* That’s all, stop editing! Happy blogging. */
/** WordPress absolute path to the WordPress directory. */
if ( !defined(‘ABSPATH’) )
define(‘ABSPATH’, dirname(__FILE__) . ‘/’);
|
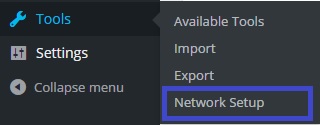
Now into the backend as “admin” user in the left side menu we need to go to tools->network setup.
Clic on install button and we will see 2 blocks of code.

As we can see there are the instructions that we need to put that code. The first one needs to be in the wp-config.php file exaclty in the place that the meesage is saying.
The second code is to replace our actual .htaccess file.
Once we have modified the two files mentioned we need to refresh the backend and we will see the “My Sites” button there.

In this instance we can activate all the plugins again.
If we need to add a new domain to the network for one of our sites in the network we can do that installing a plugin: “WordPress Mu Domain Mapping”.
Once the plugin is installed we need to move the sunrise.php file (/wp-content/plugins/wordpress-mu-domain-mapping/sunrise.php) to the wp-content directory.
And then to activate this we need to add this code in the wp-config.php:
define( ‘SUNRISE’, ‘on’ ); just bellow of the lines previously added.
|
1
2
3
4
5
6
7
8
9
10
11
12
13
|
define(‘MULTISITE’, true);
define(‘SUBDOMAIN_INSTALL’, false);
define(‘DOMAIN_CURRENT_SITE’, ‘localhost’);
define(‘PATH_CURRENT_SITE’, ‘/multisite/’);
define(‘SITE_ID_CURRENT_SITE’, 1);
define(‘BLOG_ID_CURRENT_SITE’, 1);
/* That’s all, stop editing! Happy blogging. */
define( ‘SUNRISE’, ‘on’ );
/** WordPress absolute path to the WordPress directory. */
if ( !defined(‘ABSPATH’) )
define(‘ABSPATH’, dirname(__FILE__) . ‘/’);
|
Now, refreshing the page and using the “my sites” menu we can go now to “Network admin -> Sites” and we will be able to create the subdomains.
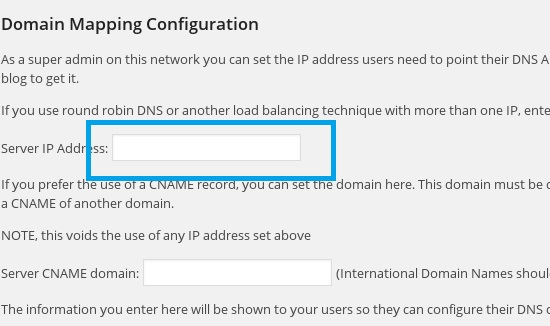
To create domains we can go to “settings->Domain mapping” filling the field with the server IP address:
Then we need to go to “settings->Domains” and filling the fields with our Site ID and the domain that you want.
To verify if all is ok, we can go to the menu “Sites->All Sites” and we need to see if there are the domains that we have already created.